Reports
In the Reports module, you are able to generate highly customized and fine tuned reports of your various records. You can track profits, sales, expenses, performance of your products and services, and export it for processing and analysis in an external application.
Effective use of the reports module can help prepare financial records for your business, monitor your progress and development, track expenses, and maintain accountability.
The categories/filters at the top of the screen help you control the data presented in the report.
- Report - This drops down to present options for the various records you can gather a report based on, such as Clients, Invoices, Expenses, Quotes, Products, Recurring Invoices, and more. The report category also includes other options such as Profit and Loss, and Invoice Items (Which unlike "Product" will also include invoiced Tasks). The columns available in your report will be based on the selection you choose here.
- Status - This allows you to only report on records with the selected status(es). This won't show for reports types that do not store dates (ex. Product, Profit and Loss...). It is recommended to ensure you are reporting on the intended status - for example, if you wish to see a list of received payments using the Payment report, be sure to filter the Status to "Completed".
- Range - Here you can select the date range to run the report for, or select "Custom" to enter a date range manually.
- Client - For reports that are for records related to a client (ex. Invoice, Quote...), an option to filter by client will appear. Here you can narrow down to a specific client to report on. Note that for reports which are not related to client-specific items (such as Products), the Client filter won't show.
- Products, Vendors, Projects, Expense Categories - Additional filters will show for these types of records depending on the report (Expense, Invoice Item, Product Sales)
Additional Report Toggles
Depending on the report selected, you will see some of these toggles. Each report is different therefore you won't see every option from the list below under each report.
- Send Email - When selected, pressing "Export" will send an email to the currently logged in Admin Portal user with the .CSV attachment of the report.
- Attach Documents - When selected, pressing "Export" will also trigger an email to the currently logged in Admin Portal user with a link to download the documents attached to all of the records in the report.
- For example, if selected for the Invoice report and you previously had uploaded documents to the invoice records (such as a receipt), then this would happen:
- A .CSV file with the report results would be downloaded to the local computer.
- An email would be sent to the currently logged in Admin Portal user with a download link for a .ZIP file containing those files.
- For example, if selected for the Invoice report and you previously had uploaded documents to the invoice records (such as a receipt), then this would happen:
- Include Deleted - When selected, deleted records will be included in the report.
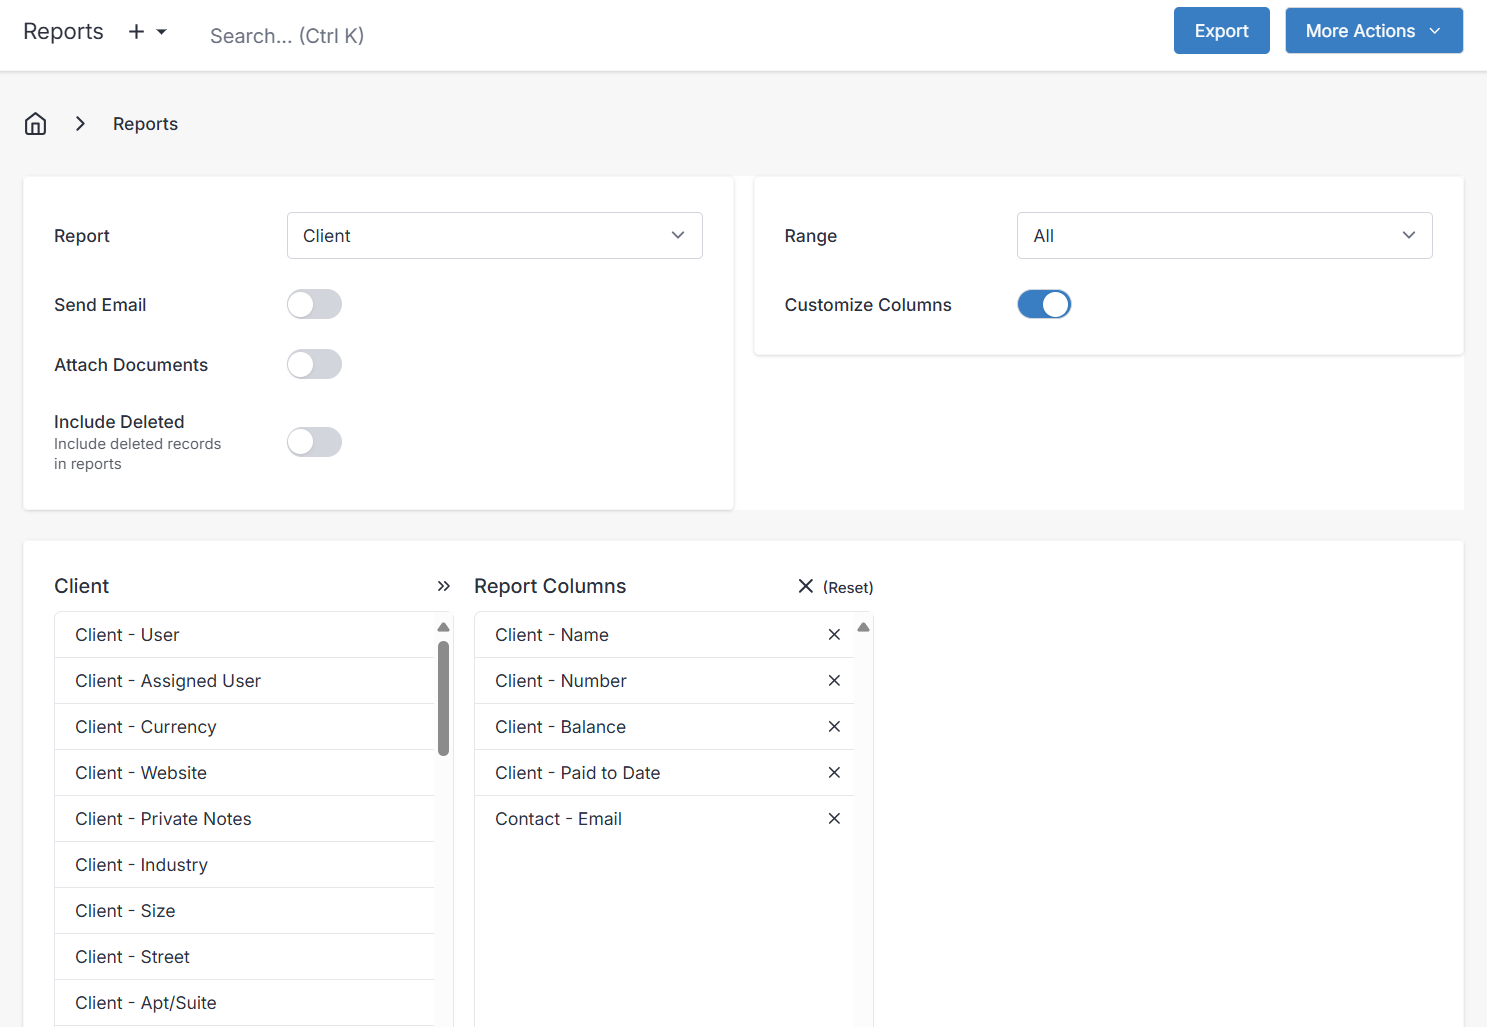
- Customize Columns - This toggle allows you to change the default columns of data to include in the report, and to use for filtering data in the report with.
- You can add/remove columns from your report by dragging and dropping between the left column and "Report Columns". The columns available to you are based off the Report type you have chosen.
- For example, the Client report customized to only include the Name, Number, Balance, Paid to Date, and Email columns:
Run the Report
After you have selected your report type and any desired filters, you will either Export to a .CSV file, or Preview the output directly on-screen.
These options are located in the top-right of the Reports screen.
- Export - You can generate and download a .CSV file with all the data reported, so you can back up your report data, or analyze it in another external application. Note that if you selected the "Send Email" toggle, this will send an email with the .CSV file as an attachment, instead of directly downloading it to your computer.
- More Actions > Preview - The Preview option will only show for reports that support previewing.
- More Actions > Schedule - The Schedule option will bring you to the "New Schedule" entry screen where you can configure a recurring schedule for automatically running the report. It will be sent to the currently logged in Admin Portal user via email.
Preview
If the report you selected supports showing a preview, you can select More Actions > Preview from the top right of the screen.
A table with the data gathered based on your filters will appear.
Filtering in Preview
The first row of the preview table has text fields where you can search/filter the results.
The "Download CSV file" button above the preview will download the currently visible records in the preview. For example, the preview below has the column "PAYMENT TRANSACTION REFERENCE" filtered to "manual"; the "Download CSV file" button will download only these 3 records shown.
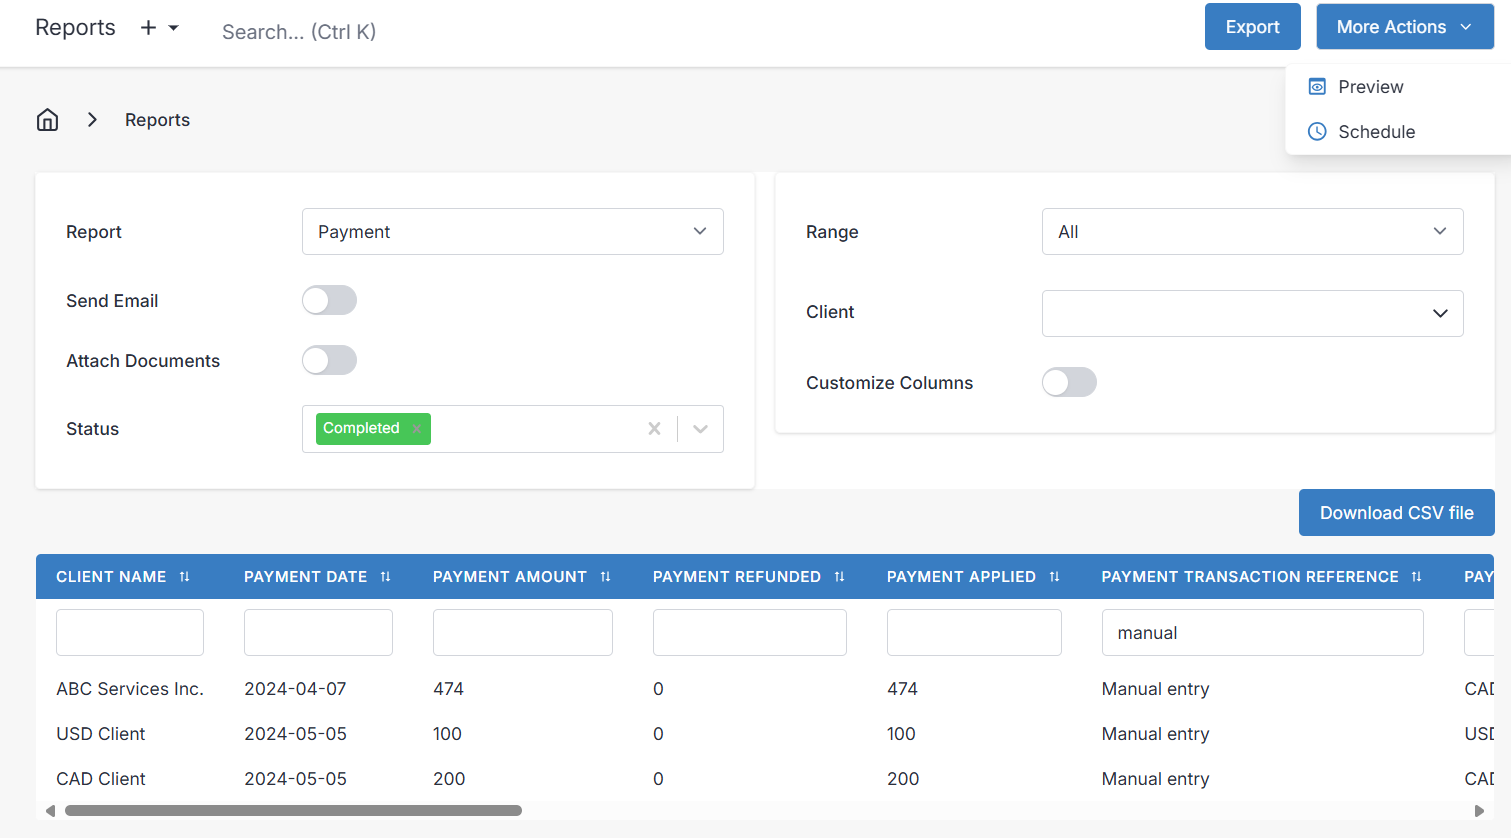
If you wish to download ALL records for the report, select the "Export" button in the top right of the screen.
Special Reports
These reports are detailed below. They are not in a single table format and you cannot customize their columns from the Admin Portal.
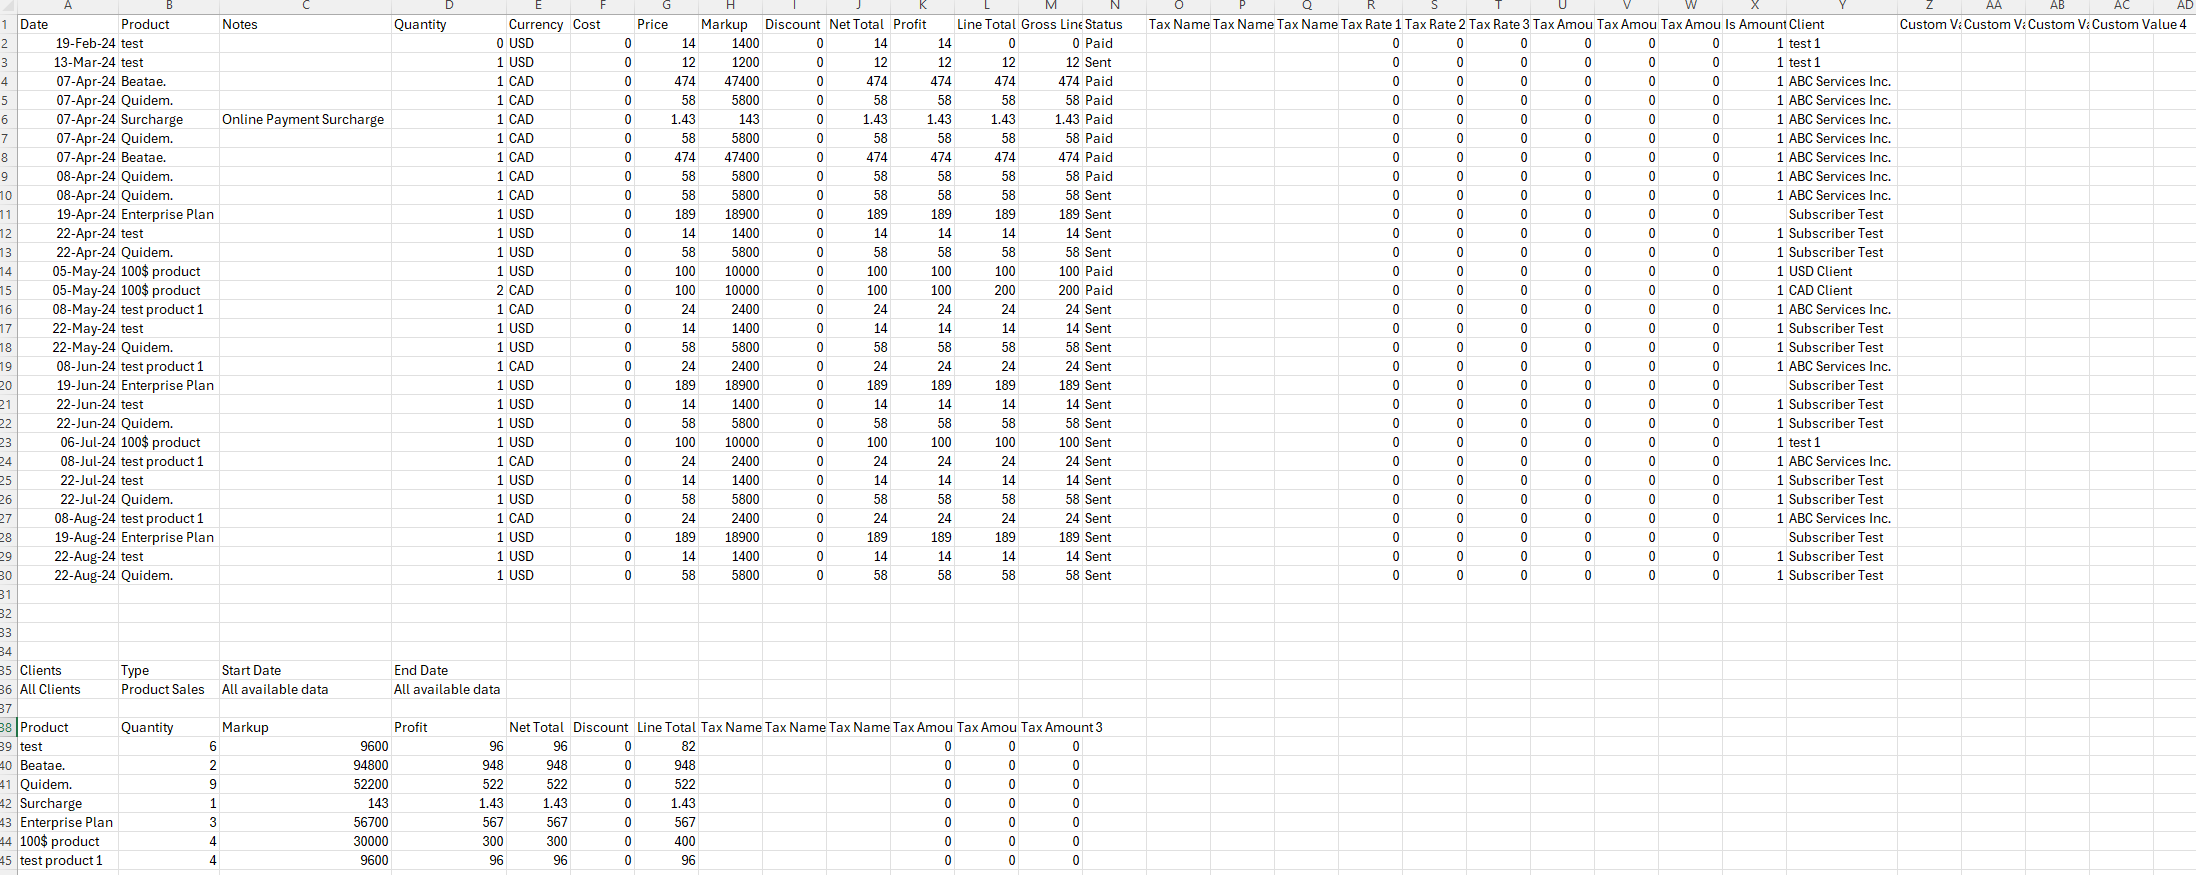
Product Sales

This report first lists each sale of a product by date. The second table lists the quantity, markup, profit, and other totals for each product.
Profit and Loss Report
This is the most common year-end report which sums up your revenues, expenses, profits, and taxes collected.
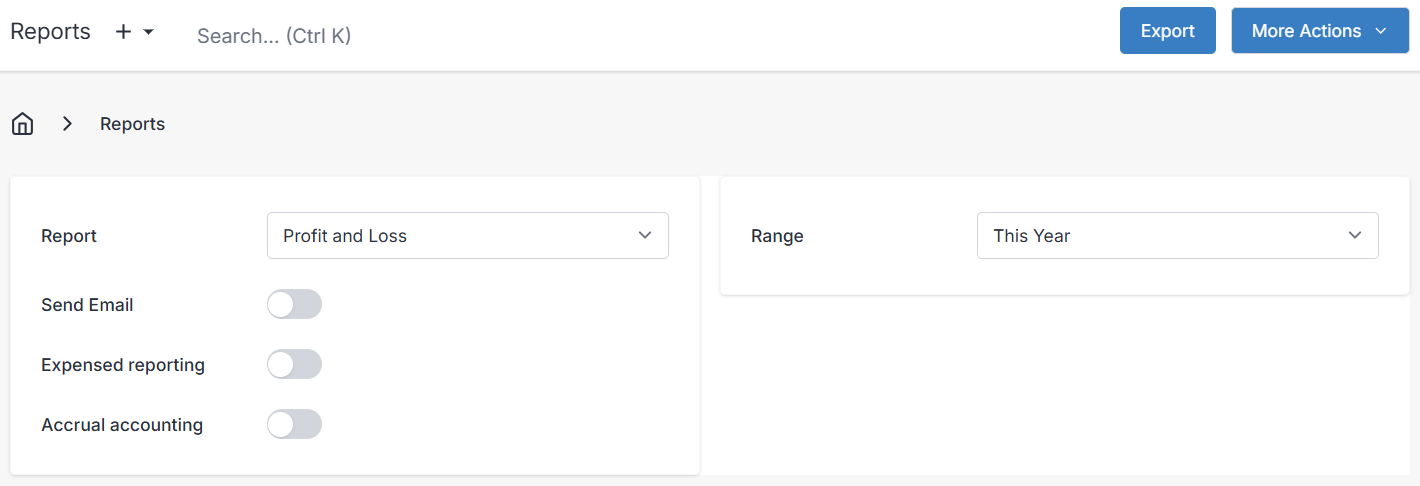
- Expensed reporting: This works similar to accrual accounting. When expense reporting is disabled: it means we tally up all expenses for that period, regards whether they were marked as paid or not.
- When toggled off, we only tally up the expenses that have been marked as paid.
- Accrual accounting: When accrual accounting is disabled: it means we tally up all invoiced totals for that period, regards whether they were marked as paid or not.
- When toggled off, we only tally up the payments that have been marked as paid.
- Include tax: When toggled on, totals of taxes collected and paid will be included in the report.
- Under "Total Revenue", "Total Taxes" represents the total taxes collected.
- Under "Total Expenses", "Total Taxes" represents the total taxes paid on expenses.
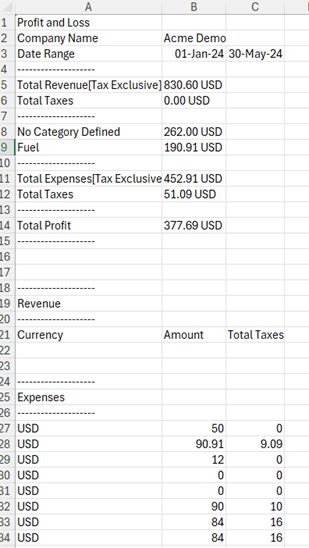
The Profit and Loss report also breaks down the expenses by category.
In the example above there was a total of $830.60 in payments received, minus a total of $452.91 expenses for a total profit of $377.69. The taxes that were paid on expenses was $51.09.
There are other reports for details such as types of taxes collected, and for a list of payments/expenses/etc.
Note that we convert all payment amounts to the company currency as set in Settings>Localization.
For example if you recorded payments in CAD and USD but your company currency is USD, the totals displayed in the Profit and Loss report will all be converted to USD.
There is also a breakdown of revenue, expenses, and currencies at the base of the report.
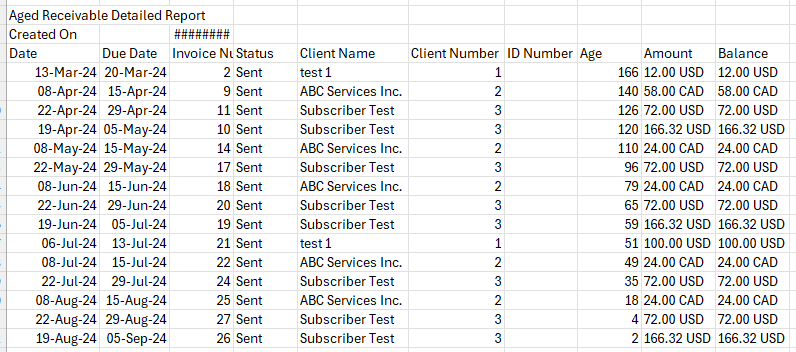
Aged Receivable Detailed Report
This report lists all unpaid invoices with their balances.
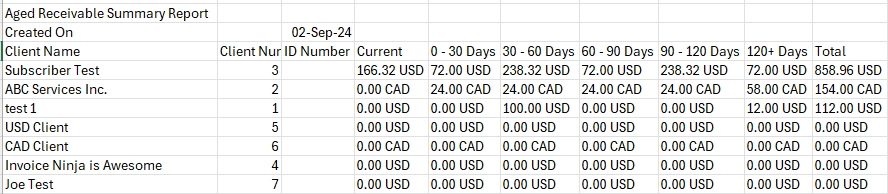
Aged Receivable Summary Report
This report lists total unpaid balances for each client, grouped into aging buckets.
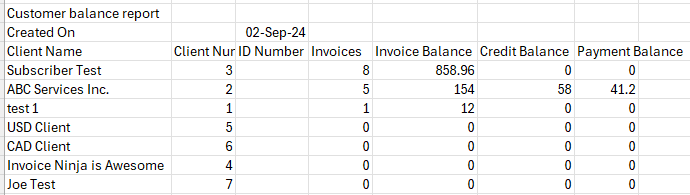
Customer Balance Report
This report totals balances for each client for invoices, credits, and payments.
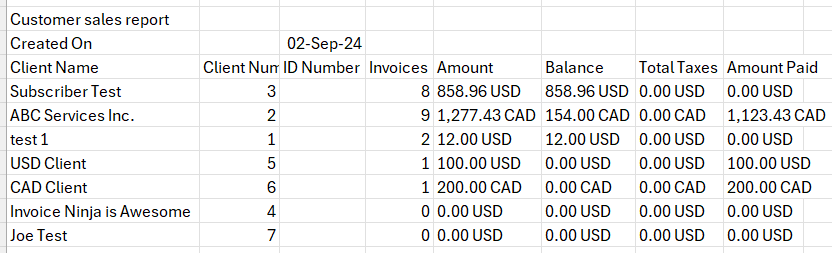
Customer Sales Report
This report lists the total invoiced, balance, taxes and amount paid for each client.
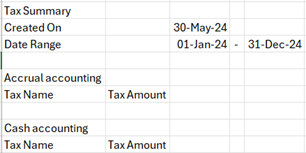
Tax Summary Report
The Tax Summary Report can be used to see a total of all the taxes collected in the chosen date range, broken down by each tax rate's name and rate. You may wish to use this report for calculating your input tax credits if you collect multiple rates.
User Sales Report
This report totals the number of invoices created, the total invoice amount, and taxes (converted to company currency) for each user.
NOTE: If you did not explicitly link a user to an invoice, the user is not assigned to that invoice. That is the reason why the example below shows a total of 22 invoices / 2,548.39 USD but the two users below that show 0 each (as they were not assigned to any of the created invoices).

Advanced Customization Tips
To run charts or advanced analysis of exported reports data, you would open the .CSV file in spreadsheet software such as Microsoft Excel or LibreOffice.
You can then select the whole range of cells for auto totals, or format as table, run charts, etc.
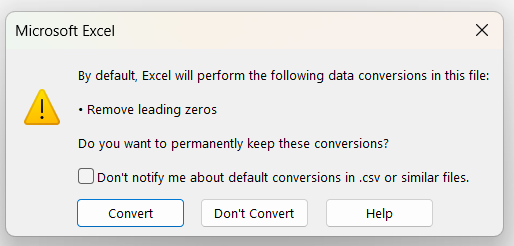
If you open the .CSV in Excel and are prompted to remove leading zeros, select Don't Convert. This is because some columns from Invoice Ninja that you exported will start with zeros which you want to see.
There are too many ways to use the customization of the Reports module to list here, but this should give you a good idea of the mechanics of the module and how to use it to generate reports that help you when it is tax season, and to monitor or review trends for product sales, or the accountability of your staff for their billing.
Tax Reports
TIP: If you are looking for an explanation of tax or sales tax report features, see this article: Tax Accounting Tips