Recurring Invoices
A recurring invoice is the template you set up once so Invoice Ninja can bill a client on a schedule — monthly retainers, quarterly memberships, annual renewals, weekly service fees. You build it like any other invoice, tell the app how often to run it, and from then on a fresh invoice is generated on each cycle, emailed to the contacts you've chosen, and (if you'd like) charged automatically against the card or bank account on file.
It helps to keep one distinction in mind from the start: the recurring invoice itself is never sent to your client. It's the blueprint. What your client actually receives is a regular invoice that the blueprint produced on its due day — with its own number, PDF, payment link, and balance. The recurring record stays behind the scenes, tracking what's been generated and what's still to come.
Creating a Recurring Invoice�
Choose New Recurring Invoice and fill it in the way you would any normal invoice: client, line items, taxes, notes, terms, footer — the items area behaves identically to invoice items, and you can attach a project, set an exchange rate, or apply a discount in the usual way. The two things that make this form different are the Frequency and Remaining Cycles fields, which control the schedule, and the support for reserved keywords in line descriptions (covered further down) so dates like "March 2026" update themselves each cycle.
When you're happy with the template, press Save, then Start. Saving on its own only stores the draft; starting is what puts it on the billing calendar.

The Schedule: Frequency, Start Date, and Cycles
The Frequency is how often a new invoice is produced — weekly, monthly, every three months, annually, and so on. The Start Date (defaulting to today) is when the first invoice goes out; set it in the future if you need the first bill to land on a particular day. Remaining Cycles tells Invoice Ninja how many invoices to generate before considering the job done — pick a specific number for a fixed-term engagement, or Endless for open-ended retainers and subscriptions that run until you stop them.
The Due Date setting controls how the due date on each generated invoice is calculated from the day it's issued (for example, fourteen days after issue). This is separate from the schedule — it only affects when payment is expected on each individual invoice.
Statuses: What Each One Means
A recurring invoice moves through a handful of states as it lives out its life. A Draft is a saved template that hasn't been started yet — nothing goes out until you press Start. Once you do, it becomes Pending: committed to the schedule but still waiting for its first run. After the first invoice is generated it flips to Active and stays there while cycles remain. If you Stop it, the status changes to Paused and no further invoices will be created until you start it again. When the last cycle has been billed the record is marked Completed. Archived and Deleted are housekeeping states for tidying up finished or unwanted records, and never affect the invoices that have already been generated.
Auto Bill: Charging the Card on File
Auto Bill decides whether generated invoices are charged automatically against the client's saved payment method (set up through one of your payment gateways) or simply emailed for manual payment. You've got four ways to configure it.
Enabled means the client is always auto-billed whenever a valid payment method is on file — the most common choice for subscriptions and ongoing retainers. Disabled means the invoice is never auto-billed; the client receives it and pays whenever they like. The two middle options put the choice in your client's hands during checkout: Opt-Out shows them a checkbox that's pre-ticked to enable auto-billing (so most will stay on it unless they actively untick), while Opt-In shows the same checkbox pre-unticked (so they only get auto-billed if they explicitly agree). Opt-in and opt-out are useful where consent matters for regulatory or trust reasons. If you're offering a hosted checkout experience rather than billing an existing client directly, have a look at Payment Links.
More Actions

Selecting one or more recurring invoices from the list, or opening More Actions inside an edit screen, exposes the controls you need to manage an active template. Start only appears on Drafts and puts them on the schedule. Stop only appears on Active records and pauses them — the status becomes Paused and no further invoices are generated until you start it again, which is ideal for a client on holiday, a temporarily suspended service, or a contract under review. Archive and Delete tidy the template away without touching any of the invoices it has already produced; Restore brings an archived or deleted record back, and when it restarts it will catch up by sending any missed cycles at roughly one per hour until it's back in sync.
Update Prices
Update Prices walks every line on the template and refreshes it against the current price in your Products list. If you've raised the price of an item you sell, this is how you carry that change into existing recurring invoices going forward — already-generated invoices are untouched, but future cycles will use the new price.
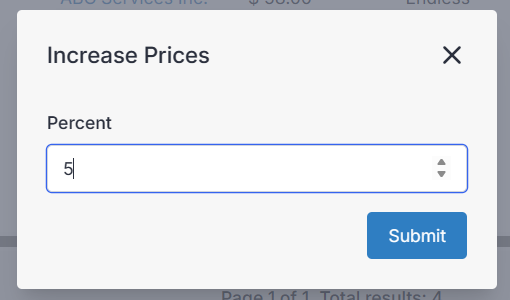
Increase Prices
Increase Prices does what it sounds like: bumps every line on the template by a percentage you choose. Handy for an annual cost-of-living adjustment across your customer base.
Overview, History, Schedule, and Activity
On desktop, clicking a recurring invoice row (anywhere except the invoice number) opens a side panel with four tabs.
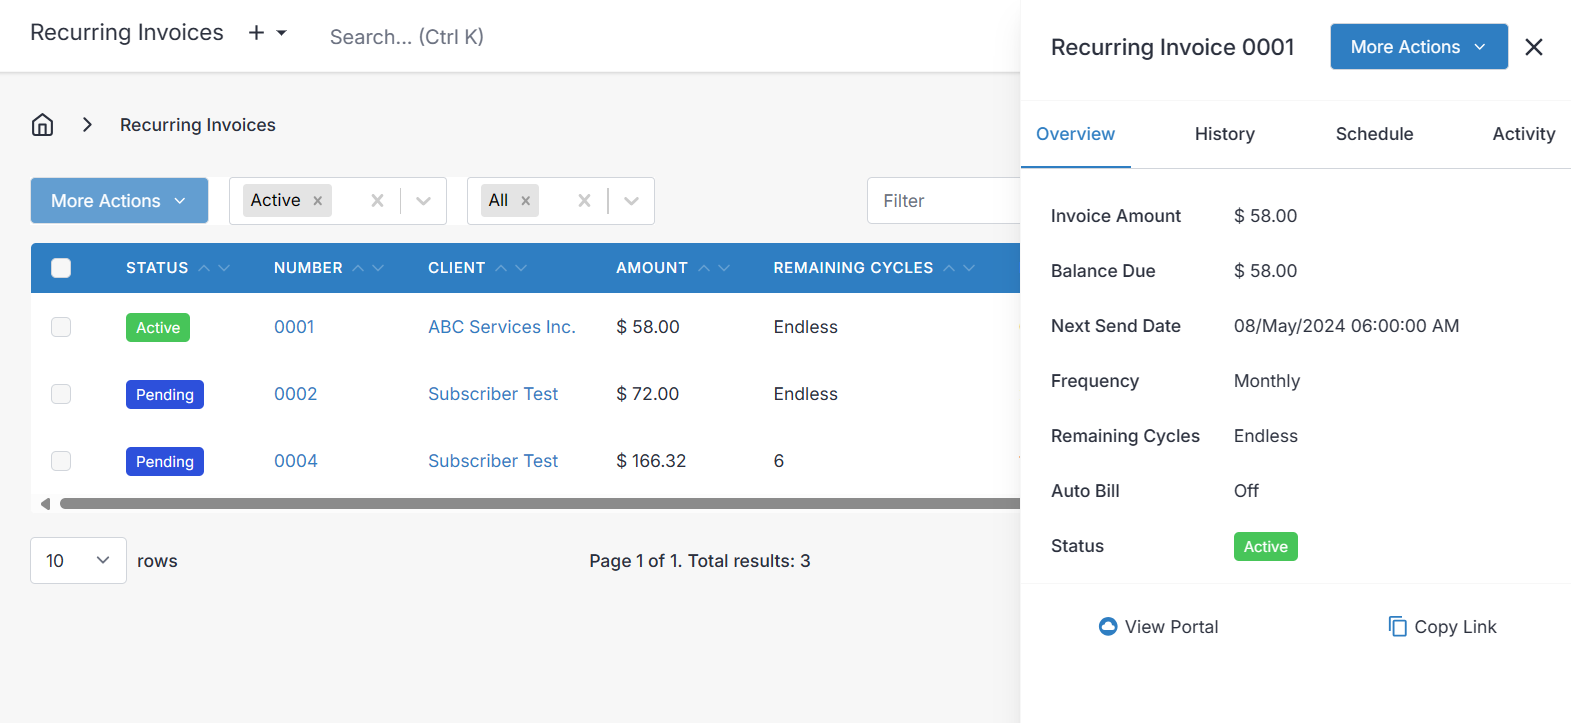
The Overview tab summarises the essentials at a glance — amount, balance, next send date, frequency, remaining cycles, auto-bill state, and status.
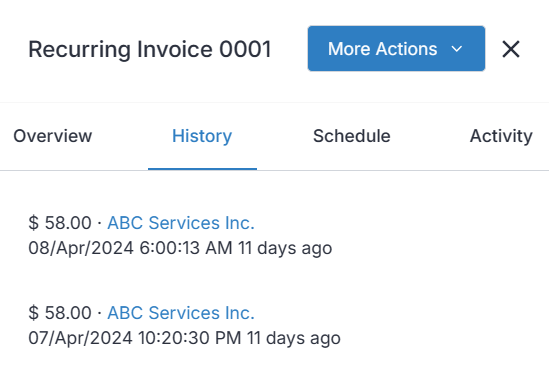
History is a chronological list of every invoice this template has already produced, with the total of each one — the running record of what's actually been billed.
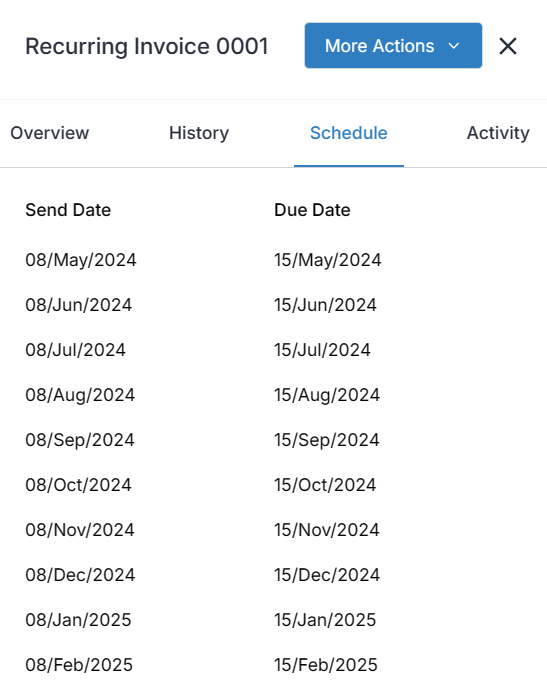
Schedule flips the view forward and shows when the upcoming invoices will go out, along with the due date each one will carry, based on your Frequency, Start Date, Remaining Cycles, and Due Date settings.
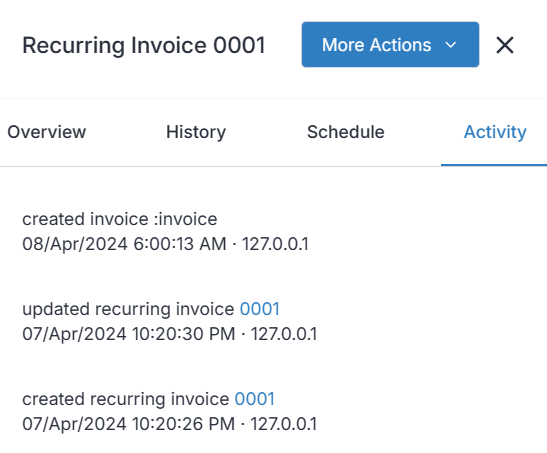
Activity is the audit trail — who created, edited, stopped, or otherwise touched the template, and when.
Reserved Keywords in Line Descriptions
Because a recurring invoice is generated over and over, hardcoding "February 2026" into a description isn't much use — by the next cycle it's wrong. Invoice Ninja gives you a set of reserved keywords that are replaced with the correct date values each time the PDF is generated:
- :MONTH
- :YEAR
- :QUARTER
- :WEEK
- :WEEK_BEFORE
- :WEEK_AHEAD
- :MONTHYEAR
:MONTH becomes the current month name (January), :YEAR becomes the numeric year (2024), :QUARTER becomes something like Q2, and :MONTHYEAR combines them. :MONTH, :YEAR, :QUARTER, and :MONTHYEAR also support basic arithmetic — addition, subtraction, multiplication, and division — so you can shift the resolved date forward or back.
The pattern is:
%KEYWORD% %OPERATION% %VALUE%
Imagine you bill gym membership every three months. Put this in the line description:
Gym membership: :MONTH to :MONTH+3

Save and preview:

Each cycle the line now names the correct three-month window without you touching it.
Supported combinations
Month: :MONTH
Year: :YEAR
Quarter: :QUARTER

:MONTH (+, -, *, /) e.g. :MONTH+1 :MONTH-1 :MONTH*2 :MONTH/2
:YEAR (+, -) :YEAR+1 :YEAR-1
:QUARTER (+, -) :QUARTER+1 :QUARTER-1
:MONTHYEAR (+, -) :MONTHYEAR :MONTHYEAR+1
Date Ranges
Simple keywords are handy, but sometimes you need a full range — for example:
Gym membership: February 2021 to February 2023
Type it like this:
Gym membership: [MONTHYEAR|MONTHYEAR+24]
Gym membership: February 2021 to February 2023.

You can also spell it out the long way:
Gym membership: :MONTH :YEAR to :MONTH :YEAR+2
The [MONTHYEAR|MONTHYEAR] syntax handles overlapping dates cleanly, so ranges that cross a year boundary stay tidy.
Supported combinations
[MONTHYEAR|MONTHYEAR +, -], [MONTHYEAR|MONTHYEAR+16], [MONTHYEAR|MONTHYEAR-2]
Translations
The word "to" between the two ends of a range isn't hardcoded — it's pulled from your localization settings, so ranges render in your clients' language.
E-Invoicing and Invoice Period Definition
Some billing relationships — particularly those requiring compliant e-invoices — need you to explicitly state the service period the invoice covers (for example, February 2026 through April 2026). The E-Invoice tab on a recurring invoice gives you a Start Date and End Date field for exactly this.

Both fields accept natural-language expressions and are evaluated with PHP's date_create() function, so you can describe the period the way you'd say it out loud.
Say your invoices generate on the 1st of October 2025 and you set:
Start Date: first day of last month End Date: last date of last month.
The invoice will carry a period of 1st September 2025 through 30th September 2025.
You can chain phrases together for finer control:
Start Date: first day of month End Date: first day of month, +1 month
That produces 1st September 2025 through 1st October 2025.