Payment Gateways
A payment gateway is the service that moves money from your client's card or bank account into yours. Invoice Ninja sits in front of the gateway, handling the invoice, the receipt, and the accounting — the gateway handles the actual charge. Without one connected, the Pay Now button on your invoices and in the Client Portal has nowhere to send the payment, so setting one up is the step that turns a PDF into a paid bill.
Once a gateway is connected, it powers everything related to getting paid online: the checkout button on each invoice email, hosted Payment Links, auto-bill on recurring invoices, and refunds issued from the Payments screen. See the full list of supported providers on the Payment Gateway Integrations page.
Setting Up a Gateway
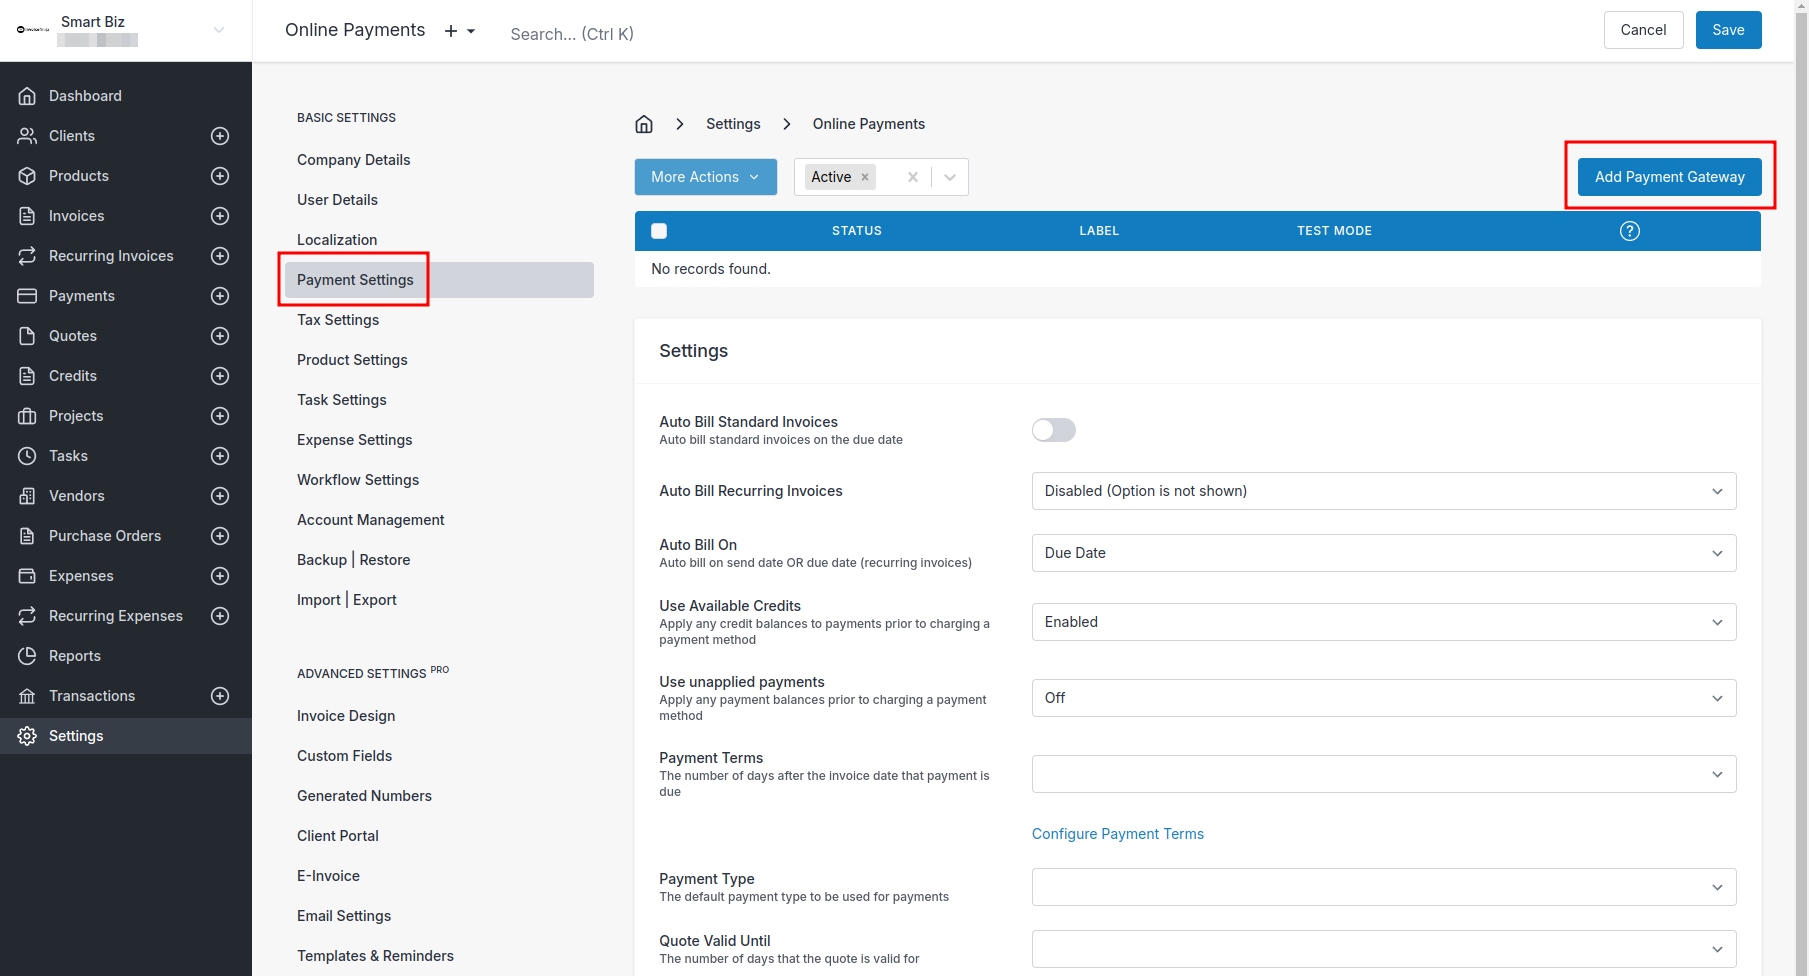
Head to Settings > Payment Settings > New Gateway, pick a provider from the dropdown, and click Setup. Stripe is the fastest starting point — it supports the widest currency range and connects via a login flow that creates the account for you if you don't already have one. Other providers ask you to paste API credentials from their own dashboards.


You can connect more than one gateway and split traffic between them — for example, Stripe for credit cards, Authorize.net for ACH, and PayPal for customers who prefer it. Gateways can also be scoped by transaction amount, so small invoices route to a low-fee provider and larger ones go elsewhere.
Each gateway configuration has three tabs: Credentials, Settings, and Limits/Fees.
Credentials
This tab is where Invoice Ninja learns how to talk to the gateway's API. The exact fields depend on the provider — usually a key pair or an OAuth connection. Without valid credentials here, nothing else works.
Settings
These control how the gateway behaves inside the admin and client portals. A handful of fields are worth calling out.
Label is a name for your own reference, shown only in the admin gateway list. Useful when you have multiple gateways of the same type (for example, one per currency).
Capture Card decides whether card details are tokenised and stored for future use. Tokenisation means the gateway keeps the card on file under a token that references it, and Invoice Ninja only ever sees that token — not the card number itself. Storing tokens is what makes auto-bill and one-click payment possible on the client portal, because the client's saved method can be charged again without re-entering details. You can force it on, force it off, or set it to "Enabled/Disabled by Default" and let the customer tick a box at checkout.
Available Payment Types lists the methods the gateway supports — credit card, ACH, SEPA, Apple Pay, and so on — and lets you enable or disable each. Required Fields lets you ask the client to fill in missing details (address, phone, VAT number) at checkout and optionally push those back onto the client record. Accepted Card Logos chooses which card brand icons show up on the hosted checkout.
Limits/Fees
This tab is how you set per-payment-method rules for the gateway. Fees and limits are attached to a specific payment type, so credit card and ACH on the same gateway can carry different rules.
- Payment Type — pick one of the methods you enabled on the Settings tab.
- Min Limit / Max Limit — floor and ceiling for the amount clients can pay with this method. Enable each with its toggle.
- Fee Percent — a percentage fee added to invoices paid with this method.
- Fee Amount — a flat fee, applied in addition to Fee Percent if you set both.
- Fee Cap — a maximum dollar value the fee can reach.
- Tax — one field per active item tax rate (from Basic Settings > Tax Settings), applied to the fee line itself.
Adjust Fee Percent is the setting for passing Stripe-style processing costs directly to the customer. If your processor charges 30c + 1%, entering $0.30 as Fee Amount and 1 as Fee Percent with Adjust Fee Percent on will have Invoice Ninja recalculate the fee so that after the gross-up, the amount you actually receive matches the invoice total. To capture the fee precisely, disable Invoice Tax Rates and use Item Tax Rates only — because the fee is added as a line item, invoice-level tax would otherwise distort the calculation. You're responsible for making sure surcharging is legal in your jurisdiction; check with an accountant if you're unsure.
Notes
We no longer support the PayPal Express API integration — we've moved to the "PayPal Platform" and now also support Venmo via PayPal.
Stripe

Stripe is our most fully-featured integration and usually the easiest place to start. It supports token billing (for stored cards and auto-bill), refunds, and a long list of regional payment methods:
- Card
- ACH
- SOFORT
- Alipay
- Pay
- SEPA
- Bancontact
- iDEAL
- Giropay
- Przelewy24
- EPS
- ACSS
- BECS
- FPX
- BTCPay
Card payments through Stripe automatically support 3D Secure (3DS) where the issuer requires it — the client is redirected to their bank's authentication page mid-checkout, and the transaction only completes once they've confirmed. This reduces fraud and shifts chargeback liability to the card issuer on authenticated transactions.
Square
Our Square integration covers credit card payments, token billing, and refunds. After signing up for a Square developer account and registering an application in the Square Developer Dashboard, paste the following into the Credentials tab:
- **Application ID**
- **Access Token**
- **Location ID**
The Application ID and Access Token live under OAuth in the Square sidebar, and the Location ID is under Location. The full walkthrough is in the Square developer documentation. Tick Test Mode while you're testing against sandbox credentials.
Checkout.com

Checkout.com supports credit card payments with token billing and refunds. You'll need the API public key and API secret key from "The Hub" on Checkout.com — sign in, open Settings > Channels, pick the right business, and the keys are on that screen. See Checkout.com Docs for more.
- Test Mode — use while your channel is running in test mode, not for live transactions.
- Threeds — turns on 3D Secure authentication for card payments. It adds an issuer-verification step at checkout, cutting fraud and shifting dispute liability.
Mollie

Mollie covers a broad set of European methods:
- Credit Card (including token billing)
- Bank Transfer
- KBC
- Bancontact
- iDEAL
You'll need your profile ID (top-left of the Mollie dashboard) and an API key from Developers > API Keys, as described on the Mollie knowledgebase. Tick the test mode checkbox if you're wiring up a Test API Key.
Error executing API call (422: Unprocessable Entity): No suitable payment methods found.
This means no payment methods are enabled on the Mollie side. Go to Mollie > Settings > Website profiles > Select your profile > Payment methods and enable Credit card.
PayTrace

PayTrace supports credit card payments, token billing, and refunds.
PayFast
PayFast handles credit card payments. The video below walks through setup.
Authorize.net

Authorize.net supports credit card payments, token billing, and refunds. You'll need an API Login ID and Transaction Key — sign in to your Authorize.net merchant account, go to Settings > API Credentials & Keys, and generate or view them. Background reading: Authorize.net Docs.
- Test Mode — for accounts running in "test mode". See Authorize.net Docs.
- Developer Mode — for developer sandbox accounts only. Sandbox accounts have their own credentials and no real transactions; see sandbox.authorize.net.
- Live Endpoint — the default value is the correct URL for live API calls.
- Developer Endpoint — the default value is the correct URL for sandbox calls. More at Authorize.net Docs.
Braintree
Braintree covers PayPal, credit card, and debit/bank transfer in one integration. You'll need a merchant ID, public key, and private key — sign in, click the gear icon top-right, and find the keys under API and the merchant ID under Business. See Braintree Docs for the full rundown.
Custom
A developer-only option for self-hosted installs. You can write PHP that talks to a gateway we don't support out of the box and plug it in as a custom driver.
Eway Rapid
eWAY supports credit card payments, token billing, and refunds. After setting up your business in the eWAY portal, hover over My Account and click API Keys. The API Key and Password fields in Invoice Ninja map to the Rapid API Key values, and the Public API Key is just below under Pay Now Button. The eWAY knowledgebase has the full walkthrough. Tick Test Mode to use sandbox credentials.
PayTrace
PayTrace supports credit card payments, token billing, and refunds. Setup uses your PayTrace API user credentials and API key, which you'll have after completing the PayTrace account process. PayTrace expects you to validate against their sandbox before going live — tick Test Mode while you're using sandbox credentials. More at the PayTrace support website.
Digital Wallets
Apple Pay, Google Pay, and similar wallets aren't separate gateways — they're payment methods that ride on top of an existing gateway (typically Stripe). Support depends on the gateway, so check before promising it to a client.
Apple Pay & Google Pay
At the moment, the client needs a card already configured in their browser or device wallet to pay this way. That's a platform requirement, not an Invoice Ninja one.
Safari on desktop:
- Safari on Mac running macOS Sierra or later
- An iPhone (iPad isn't supported yet) with a credit card configured in Wallet. More info on Apple's support site.
Safari on mobile:
- iOS 10.1 or later
- A card configured in the Wallet app
Google Chrome:
Microsoft Edge:
- Microsoft Edge 16.16299 or newer
- A saved credit card
Crypto
BTCPay
BTCPay Server lets you accept bitcoin with no fees and no intermediaries — payments land directly in your own bitcoin wallet.
CBA PowerBoard
To connect the Commonwealth Bank's PowerBoard gateway, start on the PowerBoard side and then finish up in Invoice Ninja.
API Credentials
Log in to the PowerBoard portal to grab your API credentials.
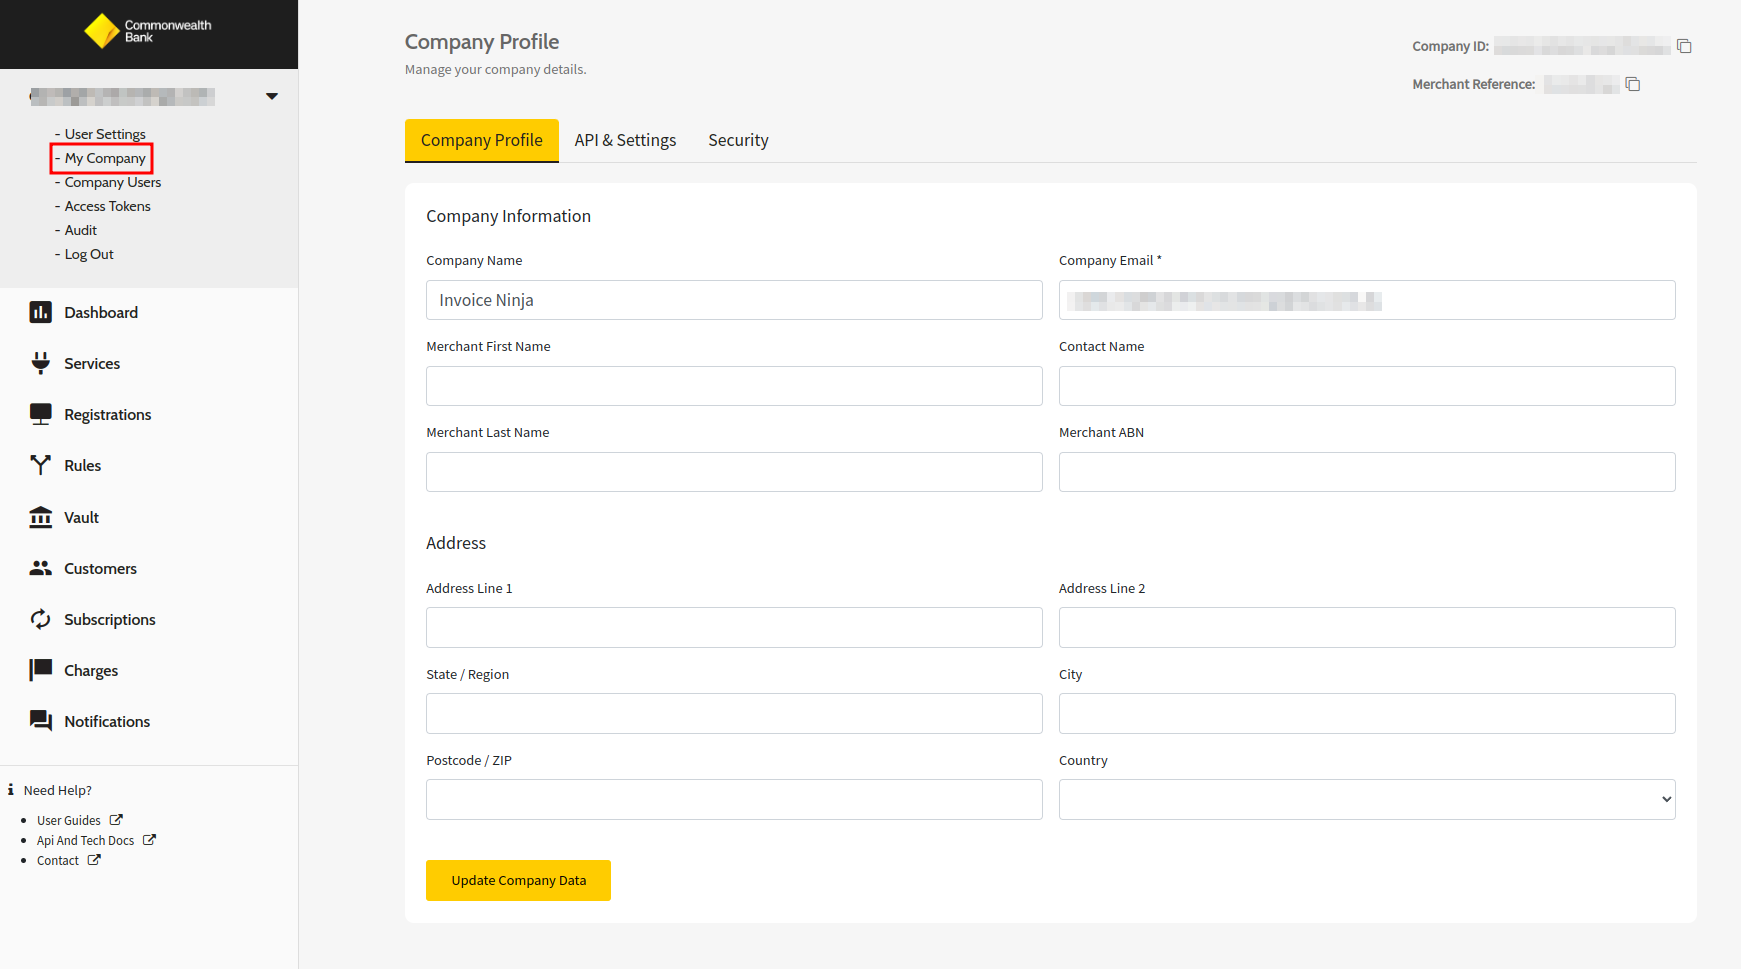
Open My Company and click API & Settings.
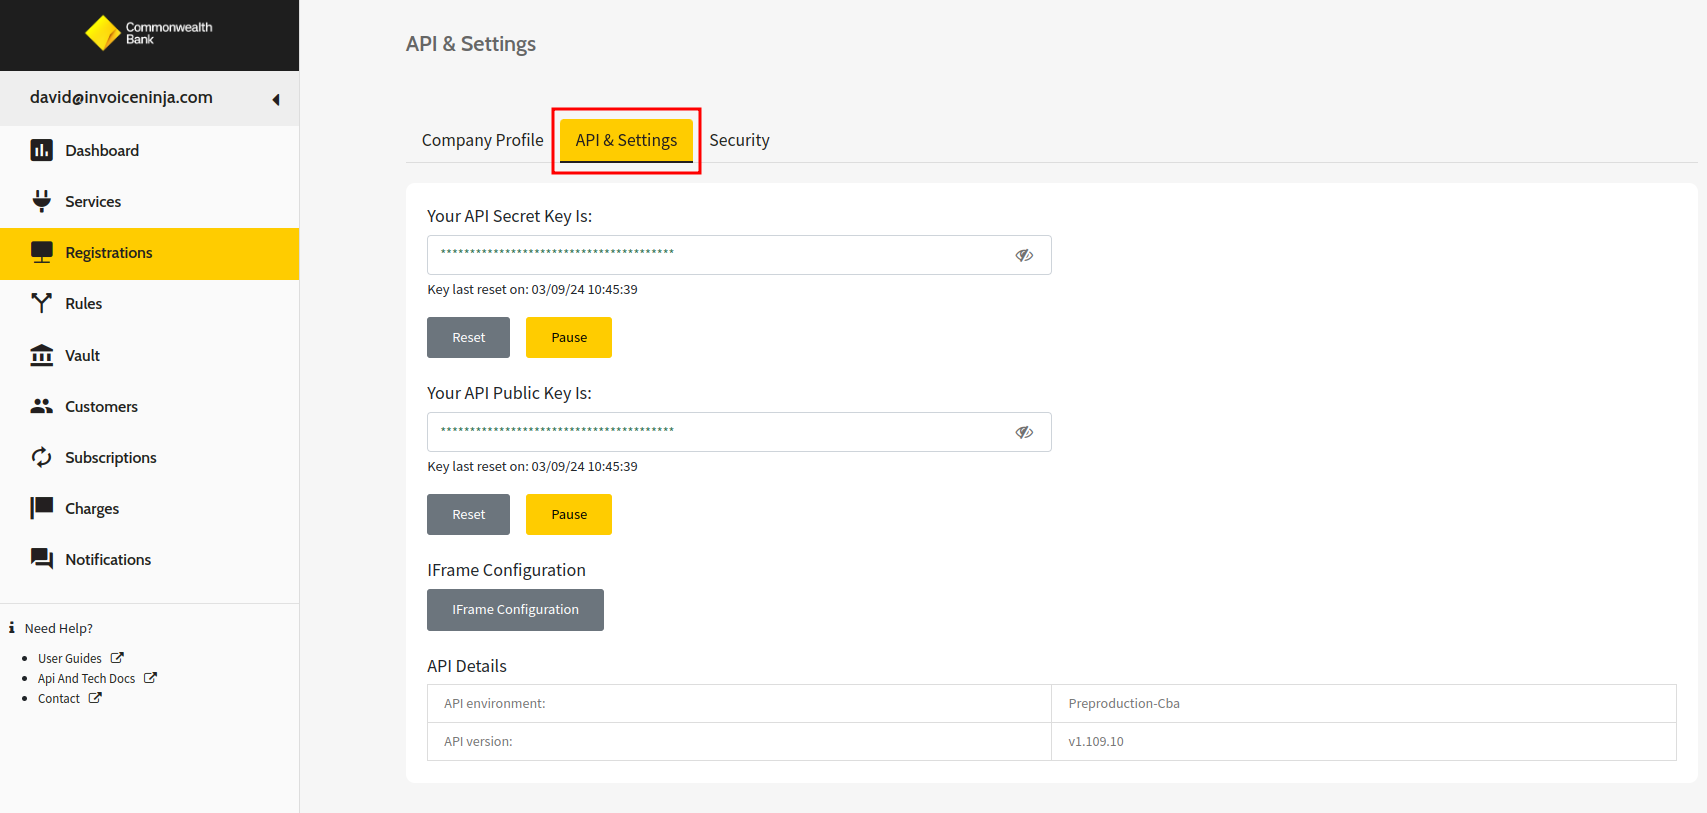
Copy the API Secret Key and API Public Key, then click the Services menu item to find your Credit Card Gateway ID.
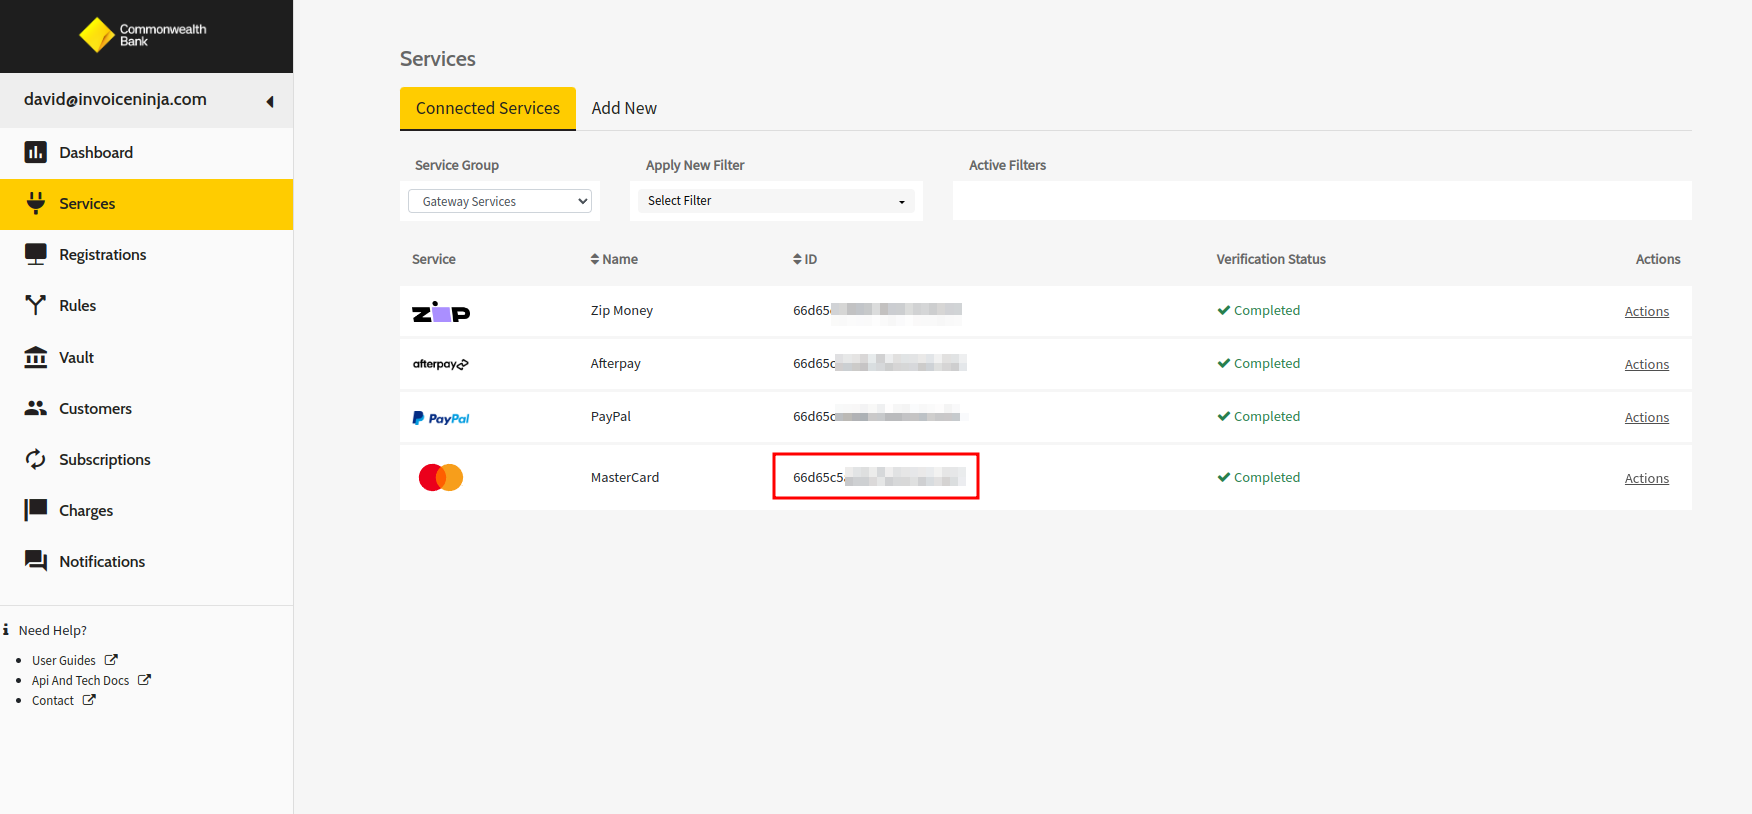
Copy the ID highlighted next to your Credit Card Service Provider.
Invoice Ninja + PowerBoard
In Invoice Ninja, go to Settings > Payment Settings, create a new Payment Gateway, and pick CBA PowerBoard from the dropdown.
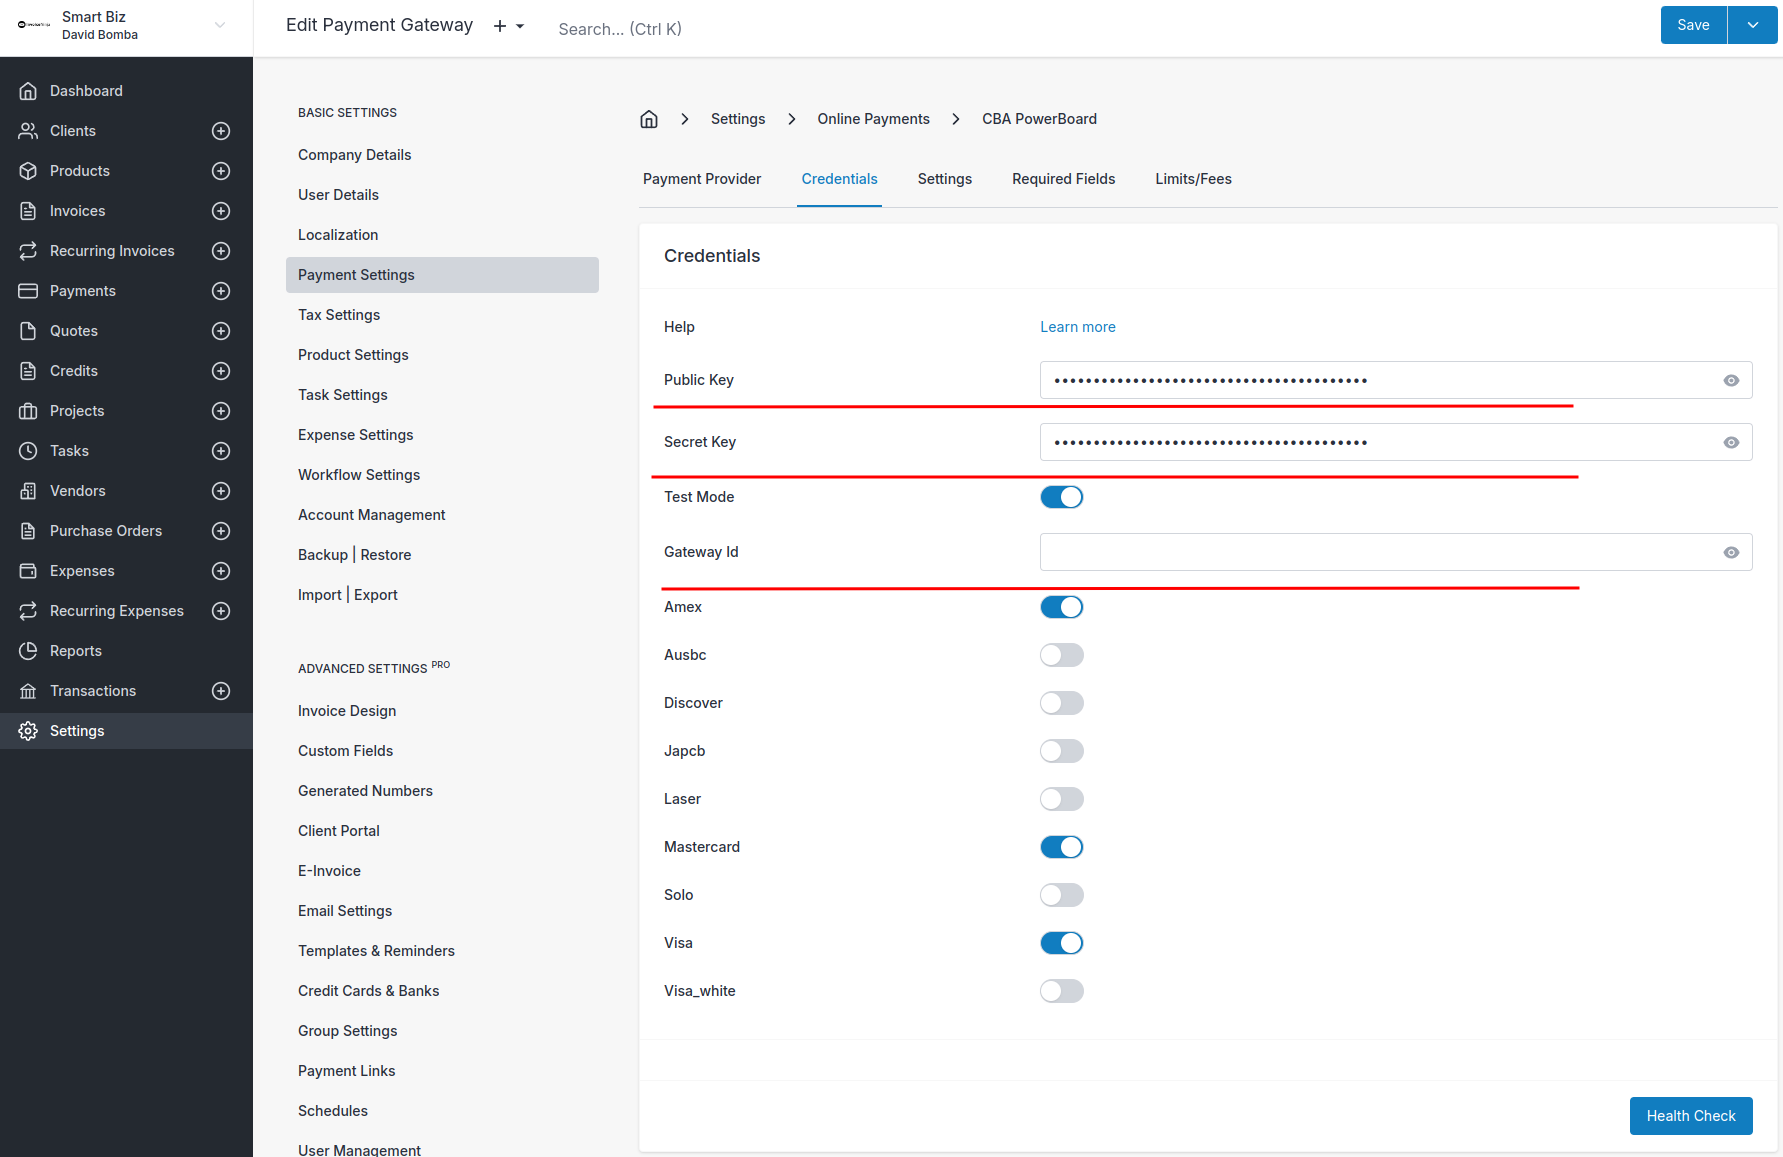
On the Credentials tab, paste in the Secret Key, Public Key, and Gateway ID from the previous step. Further down, toggles let you choose which card types to accept.
Advanced Settings
With the gateway configured, a few related pages are worth a read: