Tasks
A task in Invoice Ninja is a time entry — a record of work you've done for a client, usually billed at an hourly rate. Tasks are built for the kind of work that's measured in hours rather than units: design sessions, legal consultations, support calls, on-site visits, development sprints, or any service where what you're selling is your time. Once the hours are tracked, a task can be dropped straight onto an invoice and billed without re-keying anything.
Tasks can stand on their own, or they can be grouped under a Project when a piece of work spans multiple sessions or team members. They're also one of the most useful pairings with Expenses — together they let you bill a client for both your time and the out-of-pocket costs incurred on their behalf.
Overview
Table View
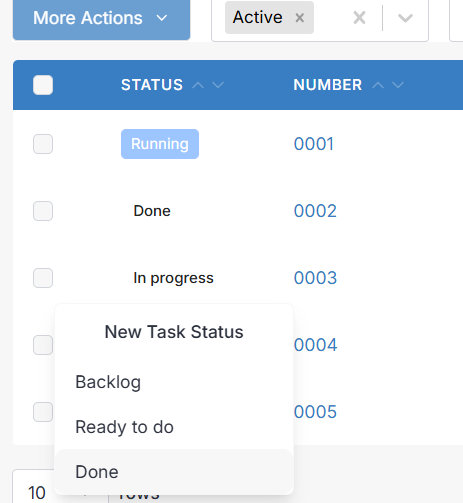
The Tasks module opens to the table view by default, showing every task in one list. You can filter by status — Invoiced, Uninvoiced, Backlog, Ready to do, In progress, or Done — and use the Columns button in the bottom right to add or remove fields like the assigned user or the rate. Click a task's status in the row to change it, or to add a new custom status on the fly.
Kanban View
The kanban view is the same data arranged as a board. Tasks appear as cards grouped into vertical columns by status, so you can see at a glance what's waiting, what's underway, and what's finished. Hover over a card to view, edit, or start and stop its timer. Drag a card between columns to change its status. Use the Project selector at the top to narrow the board to a single project, and press the + beside any column to drop in a new task with that status already set.
The kanban view is a working board, not a history view — invoiced and paid tasks are hidden so you can focus on what's still in progress. If you want the full history, use the table view.
Custom Task Statuses
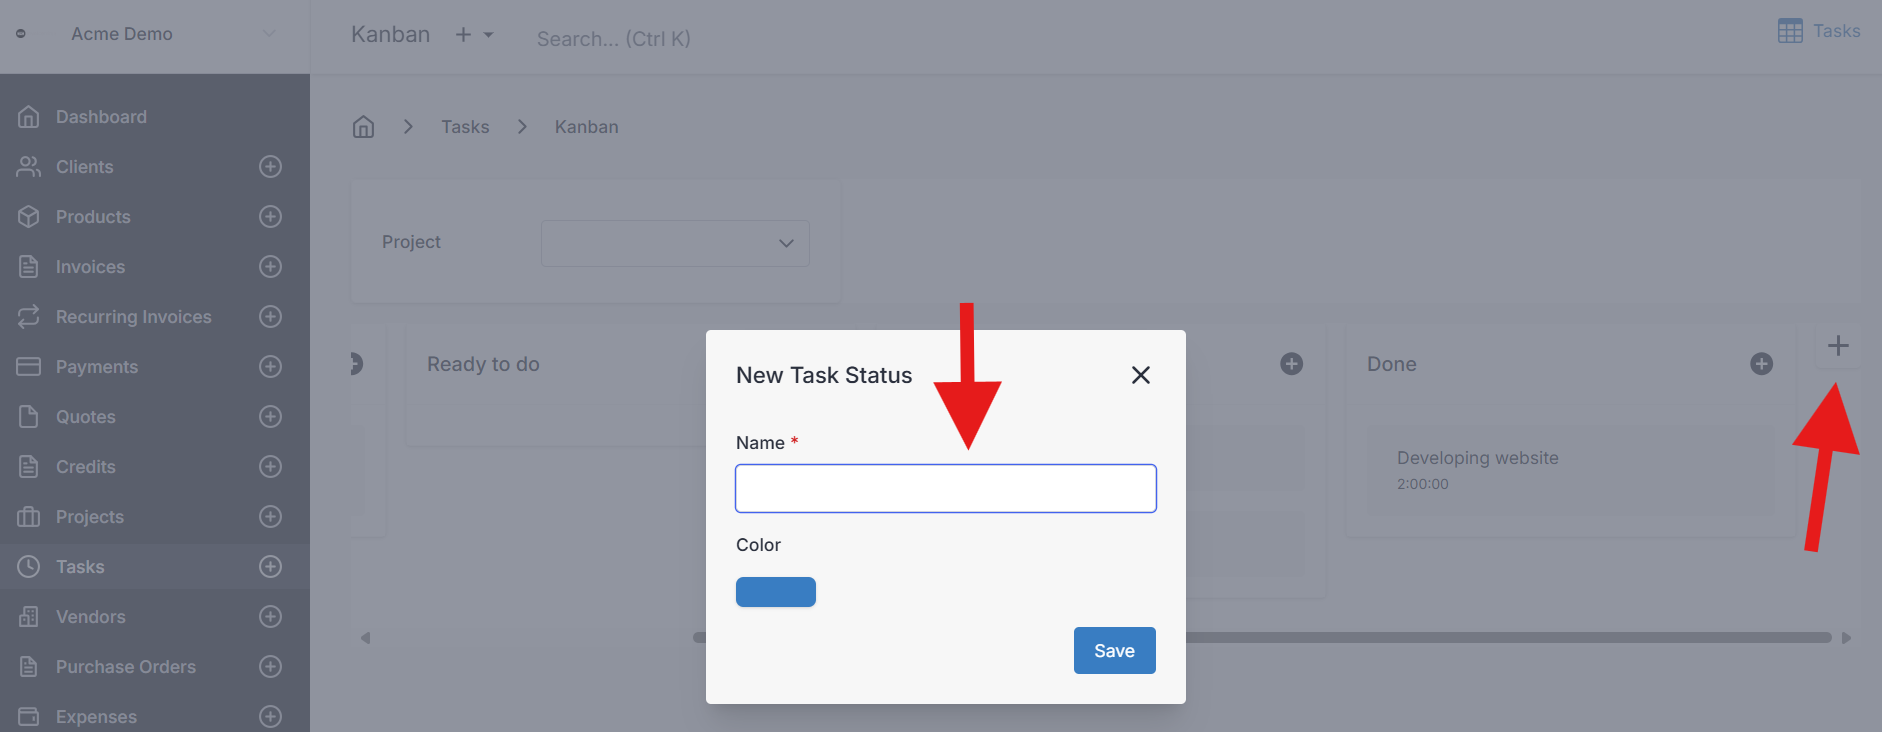
The built-in statuses cover most workflows, but you can add your own to match how your team actually works. From the table view, click a task's status and choose New Task Status; from the kanban view, scroll right and press the +. Give the status a name and a colour, and it becomes available everywhere.
From Table view
From Kanban view
To rename, reorder, or delete statuses later, head to Settings > Task Settings.
Viewing a Task
Click anywhere in a task's row from the table view, or hit View on a kanban card, to open the Tasks panel on the right. Along the top, the More Actions dropdown gives you everything you can do with that task.
More Actions
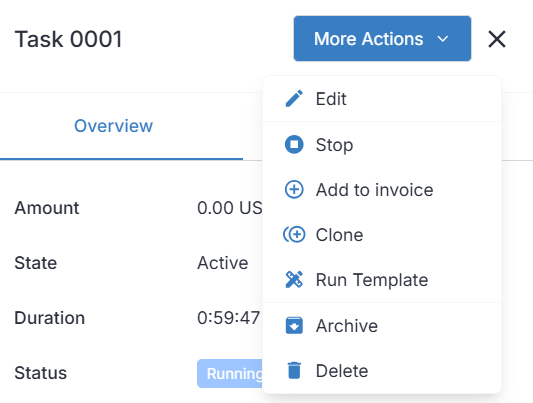
- Edit — open the task to change its details.
- Start / Stop — toggles the timer. Starting adds a new time entry with the current time; stopping closes it off with an end time.
- Invoice Task — creates a new invoice for the task's client, pre-filled with the task. Available from the task's table row.
- Add to Invoice — adds the task as a line item on one of the client's existing active invoices.
- Clone — opens the new task screen pre-filled with this task's details.
- Run Template — runs a configured template against the task.
- Archive / Delete — hide or remove the task (see Clients for how archive and delete behave across the app — the same logic applies here).
Overview Tab
The Overview tab shows the shape of the task at a glance: its current status, the total duration logged, and the resulting amount (duration multiplied by rate). Below that is the breakdown of every time entry recorded. The client, project, assigned user, and status are all clickable links into filtered lists elsewhere in the app.
Creating and Editing a Task
Details
- Client — who the work is for. When you invoice the task, the invoice is automatically raised against this client. See Clients.
- Project — optional, but useful. Assigning a task to a project automatically inherits the project's client and its task rate, so a consulting retainer billed at $150/hr doesn't have to be re-entered for every session.
- User — the admin portal user responsible for the task. Helpful for accountability when more than one person logs time.
- Task Number — leave blank and let Invoice Ninja auto-generate it based on your Generated Numbers policy.
- Rate — falls back through a simple order: the project's rate (if a project is set), otherwise the client's default task rate, otherwise the company-wide default. You can override any of them by typing a rate directly.
- Status — pick one of the prebuilt statuses or a custom one you've created under Settings > Task Settings.
- Description — the note that will appear as the line-item description when the task is added to an invoice, so write it with the client in mind.
Documents
The Documents tab is for attaching files — photos from a site visit, a signed scope of work, a PDF of meeting notes — that you want kept alongside the task. Uploaded documents can be shared with the client through the Client Portal.
To pull down everything attached to one or more tasks at once, tick the checkboxes in the table view and choose More Options > Documents. You'll receive an email with a download link.
Time Tracking
Time tracking is where most of the day-to-day work happens. Every task has a Time Entries tab that holds a list of dated work sessions, and you can fill it in however suits you.
The timer is the fastest way: press Start and Invoice Ninja opens a new entry with the current date and start time, then updates the duration every second. Press Stop and the end time locks in. If you'd rather log time after the fact — say, reconciling a day of work in the evening — type the entries in manually. You can enter a start and end time and let the duration calculate itself, or type the duration and let the end time calculate instead. Tab through the columns for quick keyboard entry.
A task with an open-ended entry (a start time but no end time yet) is considered Running. Running tasks show a live-updating duration and stay visible in the kanban view with a play icon, so it's always clear what's on the clock.
Billing a Task
Once a task has hours logged, there are two ways to turn it into money. Invoice Task from the More Actions menu spins up a brand-new invoice for that client with the task already filled in as a line item. Add to Invoice lets you append the task to one of the client's existing draft or active invoices — handy when you're batching a month of small tasks onto a single monthly bill.
If the task is tied to a project, you can also invoice at the project level and bring every uninvoiced task (and expense) over in one step. See Projects for that flow, and Invoices for how line items, taxes, and totals come together on the invoice itself.
Once a task has been added to an invoice, it moves into the Invoiced state and drops off the kanban board — it's done work, not pending work.
Task Lifecycle
Tasks can sit in several states at once (a manually set status plus a system state like Running or Invoiced), which can feel a little unusual at first. The key thing to know is which state governs when.
Logged
The default state. A task is Logged when it has a manually chosen status (either a built-in one like Backlog or a custom one) and isn't currently running or invoiced. Logged is just Invoice Ninja's way of saying "this task exists, has a status, and is waiting for you to do something with it".
Running
A task enters Running automatically the moment its time entry list contains a line with a start time but no end time yet. The duration ticks upward in real time, and the task appears as Running in the table view while keeping its underlying status for the kanban board. Completing the open entry — either by stopping the timer or by filling in the end time or duration by hand — returns the task to Logged.
Invoiced
Once a task has been added to an invoice, it's Invoiced. Invoiced tasks disappear from the kanban board (they're no longer work in progress) and, when viewed, show a link through to the invoice they belong to. If the invoice is later deleted, the task is released back to an uninvoiced state and becomes available to bill again.
Archived
Archiving hides a task from the default views without removing it. Archived tasks can still be invoiced and still count toward reports — they're just tucked out of sight. Switch your status filter to Archived to find one, then use Restore to bring it back into circulation.
Deleted
Deleting goes a step further: a deleted task is hidden and can no longer be edited, invoiced, or billed. The data is kept, though, so you can switch the filter to Deleted and use Restore to reinstate a task if it was removed by mistake.